How to add a Table to your Posts
How To Add a Table to your Posts
Note: The Table function has changed since vBulletin 3 (affects posts made before Nov. 2017).
Sometimes, it is useful to be able to put data in a table within your posts. This allows information to be sorted better and be more organized.
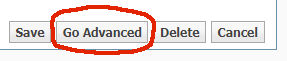
When you start a new post or reply to an existing one, you are using the standard editor. In order to add or edit a table, you need to switch to the advanced editor. to do this, click on the "Go Advanced" button, on the bottom right of the editor:
You will then see the following icons on the toolbar, that can be used for creating and changing a table:

| Insert Table |
Use this to create the table. |
| Table Properties |
Change the settings for the table |
| Delete Table |
Remove the table (careful) |
| Insert Row Before |
Insert a row above the current row |
| Insert Row After |
Insert a row below the current row |
| Delete Rows |
Remove one of more rows from the table |
| Insert Column Before |
Insert a column to the left of the current column |
| Insert Column After |
Insert a column to the right of the current column |
| Delete Columns |
Remove one or more columns from the table |
How to create a table
A table consist of a grid of rows and columns.
Click on the "Table" icon and a menu will appear:
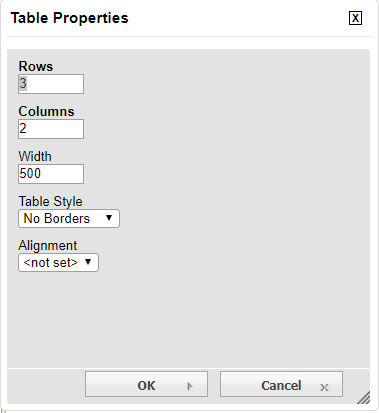
Set the desired number of rows and columns, leave the width at 500 and then decide which Table style you want:
| No Borders |
The table frame is not visible in your posts, the text is aligned. |
| Outer Border |
A frame appears on the outer edges of your table. |
| Full Grid |
A frame appears around each cell of the table. |
Now decide on the alignment of the text in the table:
| <Not set> |
The default setting is for the table to appear horizontally on
the left of the page |
| Left |
The table appears horizontally on the left of the page |
| Center |
The table appears horizontally in the center of the page |
| Right |
The table appears horizontally on the right of the page |